

How to Stretch Shoes: Tight Shoes Guide
21 May 2024
At Pavers we understand that when comfort, fit and style come together, you’ve got the perfect pair of shoes.
We also know there’s no more disappointing feeling than finding shoes that are just right, only to discover they’re a little snug when you wear them. This leads to discomfort and can cause other injuries if not addressed, so in this blog post we answer the question: how to stretch shoes that are too tight.
- Here’s what we’ll cover in this shoe stretching guide:
- The importance of well-fitting shoes
- Signs indicating that your shoes might be too tight
- How to test your stretched shoes
The Importance of Well-Fitting Shoes
Wearing well-fitting shoes has a surprisingly significant impact on your health and wellbeing throughout your life. In fact, the eminent theorist Dr Atul Gawande writes about how prescribing regular foot care can greatly reduce the risk of falling and associated injuries later in life.
Shoes that fit properly support your feet, helping you to distribute your body weight more evenly when moving. This reduction of pressure on specific areas prevents everything from foot complaints (bunions, calluses, corns and similar) to stress on your ankles, knees, back and other areas of the body.
Signs Indicating That Your Shoes Might be Too Tight
The most obvious sign that your shoes are too tight is discomfort and soreness, potentially even with blistering.
If you’re not sure though, there are a few quick tests you can do to find out. These are useful when you can’t tell whether the discomfort is caused by having new shoes or whether they’re too small:
- Check that there’s at least a finger-width of space between the end of your shoe and the end of your big toe. If not, your shoes are too short.
- You can do this at the back, too: just try to slide your finger between the back of your shoe and your heel. If it doesn’t fit, it's too short.
- For width, look at your feet after wearing your shoes for a while: if there are red pinch marks at the widest part of your feet, it’s a sign of too narrow shoes. In such cases, opting for wide-fit shoes may be necessary.
- Are your toes aligned? If they feel bunched up or being pushed to the point that they overlap, this is a sign of tightness across the width of the shoe.
- You can also do a visual check: how do the shoes look? When shoes are far too small for the wearer, it’s often possible to see this from the outside.
If you’ve identified that your shoes are too small, read on to find out how to widen them to a more suitable size.
7 Ways to Stretch Your Shoes
There are a handful of ways to stretch out a shoe that’s too small, from the obvious (use a shoe stretcher) to the less obvious (whack a potato in there).It's important to note that these methods may vary depending on the shoe's material and type.
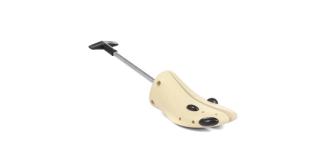
1. Use a Shoe Stretcher
Shoe stretchers are specialist tools designed to, well, stretch shoes. They can stretch a shoe across any dimension, i.e. length, width, or height. So, the tool would work if you need to stretch narrow shoes too.
They’re simple to use as well: just pop the stretcher inside your shoe, adjust it until the shoe has expanded to the required size, and leave it overnight. In the morning you should feel a noticeable difference.
You may need to repeat the process a few times for the stretching to take hold.
2. Have a Professional Stretch Them
If you’re not comfortable with stretching the shoe yourself, you can take them to a cobbler who will use their expertise and specialist tools to stretch your shoes. This is a great choice if you want a professional analysis of whether or not the shoe can be made suitable for your feet.
3. Wear Them with Thick Socks
Sometimes for a shoe that’s not super tight, just wearing them more often will allow the shoe to mould more naturally to the shape of your foot. Wearing thick socks can accelerate the process, although be aware that it will increase your levels of discomfort, too.
A lot of people suggest doing this at home in the evening: wear your shoes with thick socks as you move about the house, then take them off as soon as the discomfort gets too much.
Note that if after a couple of days,you’re still feeling tightness (or sooner if you have blisters or other injuries!) you should abandon this method.
4. Apply Heat
For certain shoe materials, applying localised heat with a hair dryer can loosen the material enough to allow stretching to take place. This works best if after 20-30 seconds of heat you put the shoe on, ideally with thick socks, and move your foot in such a way that it pushes against the tight area(s).
Materials that are suitable for this technique:
- Leather
- Suede
- Canvas
5. Freeze Them
Cold can work just as well as heat: fill a plastic bag with water and insert it into your shoe, taking care that no water spills, then pop it in the freezer. As the water freezes it’ll expand, pushing against the shoe and stretching the material.
Materials that are suitable for this technique:
- Leather
- Suede
- Canvas
- Fabric
6. Stuff Them with Newspaper
For loosening up tight toes, pack some newspaper tightly into your shoe and leave it for a while. You can also use wet paper, although bear in mind this will lead to moist shoe material and may contribute to damage or odour if not dried properly.
7. Try a Potato
If you’re feeling particularly adventurous, you can try to carve a potato to be slightly larger than the tight area, then pack it into the shoe and let stretching take place. We’ve put this at the end of the list because it’s more likely to appeal as a last resort than a first port of call. And if you do try it, let us know how you got on!
How to Test Your Stretched Shoes
When you’ve deployed your preferred shoe stretching method(s), it’s time to test whether they’ve worked. This depends on a range of factors including levels of tightness, shoe material, effectiveness of the method, and so on. Don’t be disheartened if the shoes are still tight, either: just try again, or consider getting a new pair.
1. Wiggle Your Toes
Put your shoes on, stand up straight, and wiggle your toes. Free movement is a good sign: compare this with how things felt previously, too. Maybe repeat the toe gap test as well to see whether there’s a finger width of space or not.
2. Walk Around
We’ve all done the shoe shop walk: 10-15 paces around the shop, then back to where we started to say “yeah, they feel good!” Now is the perfect opportunity to revisit the technique: go for a walk around your front room and then, if they feel good, walk a bit more. If the stretching has taken, your shoes should now feel noticeably comfortable.
Pay particular attention to the heel: this is where rubbing and discomfort is most noticeable, and if your shoes are still too tight it’s likely your heel will hurt first.
3. Use a Brannock Device
The Brannock Device is the famous foot measuring tool that made an appearance every time we were taken shoe shopping as kids. Measure your foot and compare this to the inside measurement of the shoe: if your foot is now smaller than the shoe, you’re in luck.
That Shoe’d Do It!
Shoes that are too tight can be disheartening, but as we’ve seen, there are plenty of ways to diagnose and hopefully solve the problem. We believe that investing in comfortable shoes from the outset is key. While dealing with tight shoes can be frustrating, it's better to avoid the hassle altogether. Pavers offers an extensive collection of comfortable footwear, ensuring a snug fit and eliminating the need for stretching. Remember, nothing beats the feeling of slipping into a stylish, comfortable shoe right from the start.